Social Media can be a great tool to promote events. Depending on your strategy and audience it allows you to quickly reach your audience with a direct targeted message. By no means should you solely rely on social media for event promotion. Direct marketing, email marketing, advertising and other forms of marketing communications should be considered and deployed if applicable.
Before using social media for event promotion, have a strategy in place. Deb Orton (@deb_orton) and Meg Crawford (@postgrad) of SAS (@SASsoftware) recently wrote a great blog post on this. You should review their advice and determine if social media is the right communication channel for your audience. If they are, then you can take advantage of the tips and tricks in this post. Before you start you need to have the following marketing pieces in place:
- A landing page that describes the event, lists the agenda, value proposition and link to registration processes. Even if you don’t have online registration, have a PDF form or something in place to make it easy for people to register.
- Keywords for your event. Review the event description and pull out 10-20 keywords that are applicable to the event content and purpose.
- Short summaries of 75 words or less. Many people don’t read, they scan. So have your message sell your event in the first 50-75 words. Don’t bore them with details that can be read after they have registered unless it’s very important.
- Pricing information and if there are different pricing levels for members versus non-members and any cut-off dates for early registration discounts. If you sell them on attending your event the first questions always is how much?
- Logistics around event date, time, location and directions if necessary. Don’t leave it up to the attendee to figure out the details, have them ready for them.
Now that you have your prep work done it’s time to push your message out using the three biggest social networks!
Twitter can be a great tool for spreading the word about your event. If you have a large Twitter following great. If not then this is an opportunity to grow your reach. With the 140 character limit, Twitter can be challenging to get your information out and include registration link, hash tags and the event date.
I prefer to use a tool like Hootsuite or Tweetdeck to schedule my event tweets. Typically I have a schedule in place for distribution. If I have 4 weeks to promote the event I schedule messages to go out every Monday, Wednesday and Friday leading up to the event. For the last day of early bird, discount registration I customize the message to say Last day at reduced rate… or Early bird price ends today….
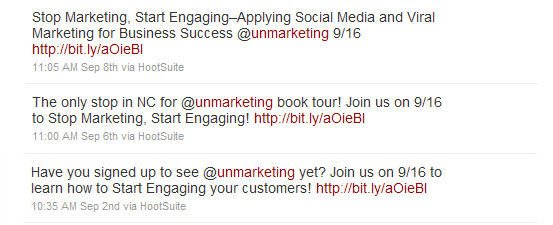
You should write three versions of your message. The reason being is that it changes up your Twitter stream and looks more original than just sending out the same message a dozen times. Also you can change out keywords to attract different audiences if needed. Here’s a sample from recent event I did for Triangle AMA.
The second major factor in using Twitter to push out your event is to track your links and clicks. I use bit.ly for a couple of reasons. First is that its tracking is great and easy to use. Second is that I can easily keep the same link whereas ow.ly will change your link for each schedule tweet even though the destination is still the same. Note that ow.ly is the default for Hootsuite. Bit.ly will also let you customize your link so I could have named this link something like . But be cautious in doing this because once you create the custom link it’s used up and cannot be used for another future unique link.
Hootsuite has a nice feature that allows you to save drafts of your tweet. I use this to save my three unique tweets and then select the drafts to schedule my outgoing tweets over the next few weeks.
Although LinkedIn Groups do not allow you to create an event within the group, a feature I would love to see, you can create a LinkedIn Event and email to your contacts. Creating an event in LinkedIn is very simple and straightforward. You simply go to the Events link on LinkedIn and select Add an Event tab. You will then be able to enter your event information in the form provided. The basic fields include:
- Event Title
- Date & Time (make sure you put in your end time)
- Venue Name
- Location (physical address)
- Website (put your landing page URL here, not your main website unless that is where you want to direct attendees)
You will see a small plus (+) sign with the words Add more details. Click on that link to add additional information including:
- Additional venue address information (city, state, zip)
- Description (This is where you want the 75 word description. LinkedIn will display the first 300 characters of this field and then show link to "see more".)
- Event Type (You are limited to the pull down menu choices here.)
- Industry (Same as Event Type, you must select from their choices in the pull down menu.)
- Keywords (Here’s where you put the keywords mentioned in the prep section. This is important for those searching LinkedIn for events.)
- Who should attend? (I tend to put a few titles in this box. I don’t know how effective or how this field is really used. I would not waste too much time putting in several levels of the same profession.)
- Organization (Who is managing or sponsoring the event?)
At the end of this section, you are asked if you are attending. The next line ask if you are organizing. You should check Yes to one of these fields for reasons explained in the next step. If you check Yes to the organizing question you can also enter the cost to attend as well as info on ticket sales, if the event repeats and who, if anyone, can edit the event. In my past experience I have not used these fields for a few reasons. First is that my events have multiple fees based on registration date and member status so I don’t want to mislead anyone on cost. Second is that most of the important information has already been entered and I want the attendee to click through to my event landing page and view these details and register!
After you’ve entered in all your information, you can preview the event or save a draft to come back to it later. If you are done proofing and all your information is correct you ready for the next step which is to publish and share your event with your LinkedIn connections. This is why I stated that you should select the attending or organizing check boxes in the previous paragraph. If I’m going to email my connections about this great event I’m promoting I want them to see that it’s worth my time as well as theirs. Also I select connections that I think would be interested in the event as well as any sponsors, co-workers, board members, etc. I don’t send marketing events to my old roommate that is a civil engineer, just like I don’t want to receive his engineering events. When emailing to your contacts you have the option to hide names which I recommend. Also you are limited to 50 connections so choose wisely. I use the By Location and By Industry drop-down menus to filter out non-target connections and if you have a lot of connections it makes the process faster.
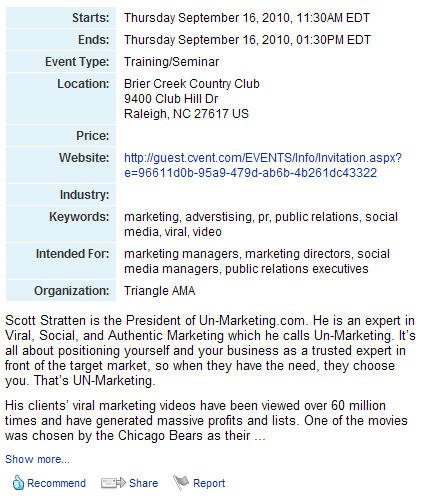
At the end of the process you will see your event detail page that looks like the example below.
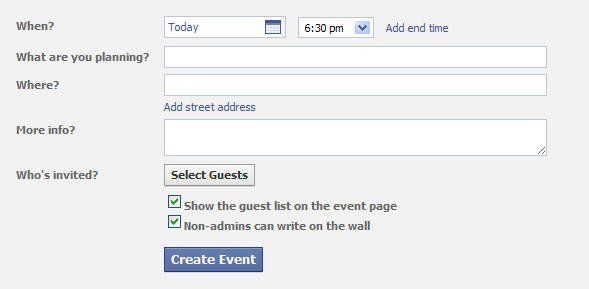
If you have a Facebook fan page for your organization then creating an event is similar to the LinkedIn process. From the Events tab you click on the Create Event button to start the process. Facebook does not allow as much content to be entered but that’s OK since you have a landing page to provide that information. The add event page is shown below:
As you can see the amount of information here is limited. Like LinkedIn always enter an end time. The What are you planning? field is your event title. I find that Facebook will sometimes give you an error message that what you entered is not valid. This usually occurs if you entered more than 10-12 words so keep it brief. Remember, drive them to the landing page for the details. The next field allows you to enter location and you can add the street address which you should always do so people can get driving directions. The More info? field allows you to enter in your 75-word description as well as your link to the landing page. Facebook with automaticallyly hyperlink the field. I tend to put the link at both the beginning and end of the description along with Register online at before the link.
The Select Guests button allows you to select contacts and/or fans to invite to the event. Similar to LinkedIn you should select contacts that are interested in your subject matter. There is no limit, or at least I have not hit a limit, to the number of guests you can invite. You can also add a personal message to your invitation if you choose. There are two check boxes at the end of the form. I keep both checked as I want people to see who’s registered as a possible draw as well as ask questions or give comments about the event. If you’re afraid of someone writing something bad on the wall then go back to your social media strategy and make sure you manage your page and this should not be an issue.
With both Facebook and LinkedIn you have the option of editing your event in case of a mistake, change of venue or date or any other situation that may arise. Facebook also has a link on the event detail page titled Update Fans of Group Name, where you can push the event out to all fans of the group. Both the edit event and update fans links are on the upper right hand of the event detail page.
That’s it, you’ve now harnessed the power of the three largest and most active social media sites to promote your event. Be sure to view the Facebook and LinkedIn event pages to see if there are any questions from attendees as well as track RSVPs. Also track your Twitter links during the promotion to see the volume of traffic and if it peaks or dips from day to day, week to week.


